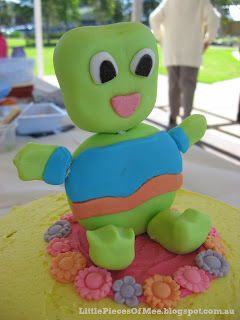
On Saturday my middle child celebrated her third birthday. Before I show you a picture of the cake I made for her party, I'll tell you the story behind the funny-looking frog on top of the cake. After my eldest daughter had her Ariel-themed birthday party about 6 weeks ago, my other daughter declared that she wanted a "Tad" party for her upcoming 3rd birthday. Tad is a soft toy from Leap Frog that sings when you press his hands, feet or belly button and is very cute. My kids have one which they play with occasionally but its not a favourite one like some other toys and teddies that they have. This is what it looks like:
So before this seemingly unusual declaration from my daughter, I had envisioned some sort of fairy/flower/pretty little girl theme for her third birthday, so I didn't mention it to her again for about a week, and one day while we were talking about fairies I asked her if she would like a fairy birthday party. "No, Mummy, a Tad party", was the reply. So we looked at pictures of different cakes that I had saved on my computer from previous cake-inspiration searches, and when we came across one with a frog on top, she said "one like that Mummy!" I found another cake photo from Cute Little Cupcakes that had lots of little flowers as a border around the base and top of the cake, with some fondant characters in the centre, and along with a few other cakes from around the web, I had a rough idea of how I wanted this frog cake to look.
The next job was the invitations. I wanted to use my Cricut to make a frog-shaped invitation with printed text on the back, so after another session on Google Images, I had a basic design which I modified to look a bit more like Tad and then added the blue and orange shirt plus eyes and a nose. I cut them out with my Cricut machine and printed the wording for the back (which I had to hand-cut because it was a bit too tricky to line it up exactly as the text was very close to the edges). Here's the finished result of the invitations:
A few nights before the party, I finally had a chance to attempt to make the cake topper. I wanted the frog to sit up like the actual toy (rather than being a flat image on the cake) so first I made the head and body using a big blob of green-coloured fondant. I put them together and they looked ok, so I continued on with the arms, legs and shirt. As the night progressed, the head and body gradually sank down until the frog looked more like a blimp. I was very disappointed with the result, and my the time my husband arrived home from work it looked very sad indeed. I had used a different type of fondant to normal, and this one was much softer so it didn't hold its shape as well. So I took the head and body apart and reshaped them and laid them down flat to dry out a bit. Luckily the second version worked much better and after using some toothpicks and melted white chocolate to help 'glue' the pieces together, I had a reasonably decent version of Tad for the cake. The face wasn't quite as cute as I'd hoped, but I was just glad that I was able to fulfil my little girl's wish to have a Tad cake.
To decorate the cake I also made some small flowers using fondant that I coloured pink, orange and purple. I used a set of silicone moulds to make the flowers - these are a recent discovery for me thanks to my Mum who bought a set for me at a recent craft show. I have since bought some more because I love that they make cake and cupcake decorating so easy! I've bought some through Etsy and eBay and there are so many different shapes available for very reasonable prices.
The larger flowers were cut using a standard metal cookie cutter and the stamen was just rolled by hand and pressed on to the flower. I also cut some stems from green fondant by hand. The name on the cake board was also cut using some letter cookie cutters, and I embossed them using the Elegant Bouquet embossing folder from Stampin Up that you would usually use for card making/scrapbooking. After the letter was cut out with the cookie cutter, I just opened up the folder and worked out which section I wanted to use for the letter, and then pressed that into the soft fondant. For the first couple of letters I used the positive side of the folder so that the pattern was pressed into the letter, but I accidentally did one letter using the negative side so that the pattern stood out and I thought that it actually looked better that way so then I did the rest that way too. When I put the name together, they alternated between positive and negative so it didn't look too out of place.
So here is the finished cake:
And a close up of the top of the cake:
Like the Ariel cake, I baked it with a coloured shape inside - for this one I did a green flower (the photo doesn't really show the shape very clearly but this was the only pic I got):
Now for the next birthday party - my baby boy turns one in a few weeks time so its time to start thinking about invitations and a birthday cake for him!


No comments:
Post a Comment